Description
This from scratch Pumpkin Pie without evaporated milk is so rich and creamy! The filling is made in the blender for a quick and easy dessert the whole family will love.
Ingredients
Scale
The Crust:
- 1 cup arrowroot powder
- 1/4 cup coconut flour
- 1/2 cup palm shortening
- 2 Tablespoons non-dairy butter (such as Miyoko’s)
- 2 Tablespoons very cold water
- 1 Tablespoon pure maple syrup
- 1/4 teaspoon unrefined sea salt
The Filling:
- 1 can (15 ounces) Pumpkin Puree (not pumpkin pie filling)
- 1/2 cup unsweetened full fat canned coconut milk, mix the water and fat thoroughly before measuring
- 1/2 cup pure maple syrup
- 1/4 cup organic non-GMO cornstarch (I recommend using cornstarch however for a paleo alternative arrowroot powder can be used)
- 1 teaspoon pure vanilla extract
- 1 teaspoon ground cinnamon
- 1/2 teaspoon ground ginger
- 1/4 teaspoon ground nutmeg
- 1/4 teaspoon ground cloves
- 1/2 teaspoon unrefined sea salt
- 1/2 teaspoon fresh lemon juice
Instructions
The Crust:
- Preheat oven to 350 degrees F.
- In a food processor, add arrowroot powder, coconut flour, palm shortening, non-dairy butter and salt.
- Pulse a few times while drizzling in the cold water and maple syrup. Continue pulsing until a thin but well mixed dough forms. (The dough will be very sticky, this is normal.)
- Using a rubber spatula spread the dough (no rolling needed) into a 9-inch pie dish on both the bottom and sides. Evenly disperse the dough around the dish as well as you can and smooth the dough out with the rubber spatula.
- Par bake the crust by baking for 10 minutes.
- While the crust is baking begin on the filling.
- Put all filling ingredients into the blender and blend until smooth. Before pouring into the pie crust use a rubber spatula to slowly mix the filling in the blender from side to side and top to bottom, this will remove air bubbles in the filling created by the blender. (You don’t want air bubbles in your pie.) You can also tap the blender on the counter between stirs. Once you do not see any air bubbles and the pie crust has finished par baking, pour the filling into the crust.
- Bake the pie for 65-70 minutes. *The center of the pie will still be slightly jiggly once baking has finished but will firm up during the cooling process.
- After baking remove the pie from the oven and allow to cool completely on the counter (on top of a wire rack, if possible to aid cooling) before moving to the refrigerator. Counter cooling will take a couple of hours.
- After the pie has cooled, transfer to the refrigerator for at least 4-6 hours but preferable overnight.
- The pie should remain in the frig until serving. (Any leftovers should also be stored in the frig.)
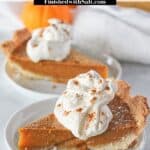
- Serve topped with coconut cream and a dash of cinnamon if you choose and enjoy!
Notes
*It is very important when baking to ensure that your oven temperature is heating to the temperature set. This can easily be verified with a small oven thermometer often found in the grocery store. If your oven temperature is off your results will greatly vary.
Keywords: pumpkin pie without evaporated milk, vegan pumpkin pie, dairy free egg free pumpkin pie,